If you've got a couple of VMs, then trimming them occasionally will help with storage management on the host. Disk files (like VDI and VMDK images) will grow over time if the VM was configured to expand the disk as needed - but they will never shrink on their own.
This was tested on a Windows 10 VM managed by VirtualBox, the starting file size was over 40GB, as it had been used for various roles and grown over time.
Our test VM - starting size
1 - Perform a disk clean-up.
There's going to be a ton of Windows updates, temp files and other junk that keeps accumulating over time.
a) Open explorer and open properties on the primary drive
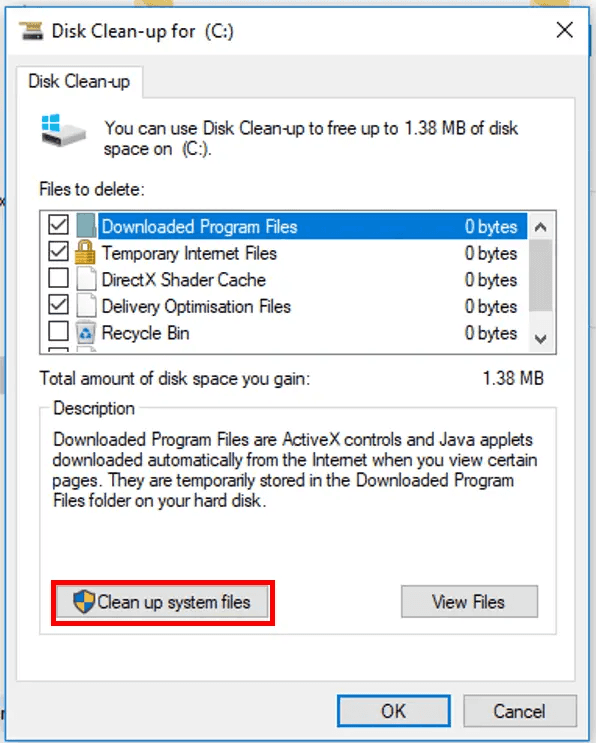
b) Click on "Disk Clean-up" under the general tab
c) Clean all files (don't miss the "Clean up system files" section)
Clean up system files to catch all Windows update files too (this was after running hence zero values estimated)
2 - Disable hibernate.
Use the native save or suspend functionality in the hypervisor rather than the Windows functionality, and save on the chunky hiberfil file.
a) Open a command prompt (run as Administrator)
b) Run the following command: powercfg /h off
Disable hibernation with this command
3 - Reduce pagefile size or disable it.
By default Windows can assign some pretty large pagefiles. Tune these down to save several more GBs.
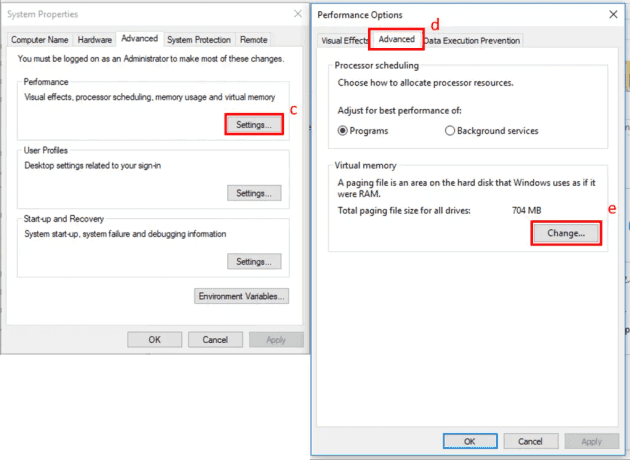
a) Click start, search for "System" and open it
b) Open "Advanced system settings" from the left hand pane
Getting to Pagefile settings
c) Open performance settings
d) Click on the "Advanced" tab
e) Click "Change" under virtual memory
Change this value to an appropriate amount, save and restart the system.
4 - Compress system files.
Use compact.exe to slim down your system files. This will eek out another few GB in savings, even when some system files are already in the compact state.
a) Open a command prompt (run as Administrator)
b) Optional - verify the current state by running: Compact.exe /CompactOS:query
c) Enable compact mode by running: Compact.exe /CompactOS:always
This may take 10-20 minutes to make the required changes, and it'll update you once it's finished.
Compact status and result - directories were already partially compressed
5 - Overwrite free space with zeros
Although the space is empty, it's still full of 1's and 0's. VirtualBox won't see this as free space until we fill it with 0's. If you're not running a SSD, you may need to optimise/defragment this drive first.
Microsoft has a tool called SDelete - download this to the VM, extract it and do the following.
a) Open a command prompt (run as Administrator)
b) Navigate to where you extracted the zip file: cd c:\users\username\downloads\sdelete
c) Run the following command: sdelete.exe c:\ -z
d) Accept the licence terms if it prompts you
e) Once complete, shut down the VM
[](https://withdave.com/wp-content/uploads/2018/07/sdelete.png)
Navigating to and starting sdelete on C:\
Once that's done, we're in good shape to compact the disk.
6 - Compact the disk image
Back in the host system, we can use VBoxManage.exe to compact the disk image.
a) Open a command prompt (run as Administrator)
b) Navigate to the VirtualBox program directory: cd "C:\Program Files\Oracle\VirtualBox"
c) Run the following to get a list of all disk images registered with VirtualBox:
VBoxManage.exe list hdds
Listing hdds shows all attached disks. We can see the location matches for the first one in the list (hidden in the screenshot)
d) Compact the image using the following if it's a .VDI format:
VBoxManage.exe modifymedium disk "C:\users\username\VirtualBox VMs\vmname\disk.vdi" --compact
If it's a .vmdk format, then you'll receive an error like:
Progress state: VBOX_E_NOT_SUPPORTED
VBoxManage.exe: error: Compact medium operation for this format is not implemented yet!
In this case, we have two options.
Option 1 - Convert the file to VDI and then back to VMDK
Option 2 - Use the VirtualBox UI to clone the VM
I'm going to use option 2 here as it uses less disk space for the process (option 1 requires a full copy, option 2 only uses the compacted space when cloning).
Creating a full clone via the GUI
This results in a new copy of our VM, so we need to delete the original once this is complete.
Final compacted size of clone
The resulting file is approx 50% the size of the original image.


